Showing posts with label fitspo. Show all posts

Sunday, September 15, 2013

Protein Pumpkin Muffins


Yes it's the start of fall so of course I am going to post something with pumpkin in it.


However, I've been making these for the past few months and it just dawned on me that I have yet to blog about these amazing muffins that I devour weekly.


Pumpkin has ~Vitamin A 2650 IU that, my friends, is a A LOT of Vitamin A.
Why does this matter?
Well because Vitamin A has a multitude of health benefits for the body including, eye health, skin health, teeth and bone health, and is made from the powerful antioxidant beta-carotene which in current studies has helped fight cancer.

So eat up my friends.


Oh did I mention each muffin is ~64 calories, 8 carbs, 4g protein, and 2g fiber? Yup.


Enjoy.

Makes ~18 muffins
Ingredients
1 15oz can of pumpkin
2 cups oat flour
2 scoops vanilla protein powder
1/2 cup applesauce
1 tsp vanilla
3-4 large egg whites (~9tbs)
1 1/2 tsp cinnamon
1/4 tsp nutmeg
1/2 tsp salt
1 tsp baking soda
1 tsp baking powder

*Optional: a handful chopped walnuts


Directions:
Preheat oven 350 F. 
Mix everything in a large bowl.
Scoop about 1/4 cup into each muffin tin compartment.

Bake for 15-18 min, until toothpick comes out clean.

Enjoy!

p.s. Serving size is ~3 muffins.

Monday, September 2, 2013

Low Carb Greek Yogurt Pancakes


So I pretty much stole this one from my self. Greek Yogurt Pancakes are my favorite "normal" pancake to make, but the carbs can add up quickly. I'm trying to rotate my carb intake now, so I needed something that was going to allow me to fulfill my craving for pancakes on my low carb days.

Bring in the oatmeal.
copyright bobsredmill

Rolled oats are a fantastic alternative to flour, when ground up, and can be gluten free! yeah!

It's also a 1:1 ratio so no tricky measuring, just use the same amount of oats as you would flour.


Now, you can buy rolled oat flour, or you can buy regular oats and the blend them yourself (that's what I do).

I love using ground rolled oats in muffins, cakes, and cookies too!

Alright, ready for some awesome high protein, low carb pancakes? Go.

Makes ~10 pancakes
Ingredients
1 large egg
1 cup greek yogurt
1/2 cups rolled oats, blended
1 tsp vanilla
1 tsp baking soda
1/8 cup milk of choice (I use almond milk--the more milk you use the thinner the batter, your choice)
Optional (my favs):
1/2 tsp cinnamon
1/2 scoop vanilla protein powder 


Directions
Heat a large skillet on Medium heat.
Blend your 1/2 cup rolled oats to a fine powder and place in a medium bowl.
Then whisk in your greek yogurt, egg, vanilla, and baking soda.
Add cinnamon and protein powder, if desired.

Scoop and pour batter and evenly  into the heated skillet. (I use a 1/4 cup to scoop, pour and even out the batter)
Cook until bubbles start to pop on top of the batter and then flip.
Cook for another 45-60 sec.
Repeat until all batter is gone.

Top with some delicious fruit, or jam (blueberry jam is my favorite!)
ENJOY!!!


Nutrition Information: 
Serving size ~5 pancakes
172 Cal * 19 carbs *4.5g Fat* 21.5g Protein * 2.5 g Fiber*

 P.S. It's okay, you can eat them all and still be under 350 calories and have 43g of protein: I DID!

Saturday, August 17, 2013

Eat More to Weigh Less

"Eat More To Weigh Less!"


I wish I could shout this to the world. 
I wish  I had heard those words 4 years ago
 (but then again I may not have understood them as I do now). 
I wish good and sound nutrition was broadcasted to our ears instead of the junk/fake/made-to-fail stuff we keep trying over and over. 

I started my weight loss journey 4 years ago, reached my goal a year and a half ago, and now I'm just trying to live a healthy and positive life.
It's not a cake walk--although I love that game, walk around in a circle and win a cake, GENIUS--however, it is rewarding knowing and feeling literally more alive.

Food wise, my journey began with cutting and counting those calories. I discovered that 1200 calories a day was the lowest limit prescribed to a female, so that is exactly where I set my daily intake goal. For almost 2 years I only ate 1200 calories a day.

Seriously. I worked out like crazy, mainly hours on the elliptical and running outside,


(Hey, I did run a half marathon in under 2 hours!)
 
and still only ate 1200 calories a day. I mean they said burn more than you eat so I tried, and I was starving myself.

Oh I lost weight, in fact it was on that regiment that I reached my weight loss goal (YEAH), but I didn't feel right. Sure, I looked great, but I felt weak, and ALWAYS hungry.

Now, after I reached my goal I didn't know what to do. I was getting married, moving away from my home, and there was no way I could keep this strict diet for the rest of my life; it wasn't normal or natural.


So I let go. 
I quickly gained back 10lbs which was discouraging. But, this time I had a stepping block because I knew I could reach that goal again. I mean I was just there, but I needed to find a better way to get there; a way that I could maintain for the rest of my life (well the part I can control).
So I said to myself, forget the scale. I just want to be healthy and STRONG.

And thus weight lifting came into my life.

I joined the website bodybuilding.com because first of all have you seen the pictures they post of the people that use and promote their site? Pure awesome.
Secondly, I read a lot of articles they've published about nutrition, especially woman's nutrition (Female's Fitness Bible being my favorite) and was hooked.
From there I found Jamie Eason. A world class female fitness model and trainer whose goal in life is to help educate people about nutrition--my kind of gal.

I signed up to do her 12 Week LiveFit Trainer workout and nutrition plan
 
(Click HERE to see my journey)


and in 12 weeks not only was my body changed, but so was my life.
Within the first month I couldn't believe the transformation my body was going through, best of all I was getting abs by eating more!
You know that saying that is going around "abs are made in the kitchen?" Well after my first month I knew it was true and I couldn't have been more excited.
I made it though the 3 month journey,  no easy feat let me tell you, but I learned so much about nutrition and strength training, and how when combined properly they could produce amazing life-maintaining  results.


So what did I eat?


It was hard to get started on the Livefit trainer nutrition plan because the first month called for no calorie counting, just body fueling she called it. (with exercise of course)

So ate I ate everything really, that was whole and natural  (with a few chocolate cakes in between, not going to lie) 6 times a day. 6 full meals. Not 3 meals and 3 snacks--although some meals were bigger than others-- none of them lacked in nutrients.
 Months 2 and 3 calories came back into the picture but at no loss. I would eat high days and low days just to keep my body guessing, but those calorie counts were nowhere near 1200; more like 1450 on low and 1600-1650 on high.
I would say my biggest food/fuel source was protein. I upped my protein intake dramatically, I am talking 6oz of protein 2 times a day plus protein shakes and other rich in protein foods such as greek yogurt, cottage cheese, nuts, etc.

*check out my high protein meal ideas*

I did eat carbs such as brown rice, whole wheat bread, pita,and quinoa, but I learned the power of only eating them when I was also eating high amounts of veggies and/or protein. This stopped my glycemic index from spiking and kept my body's metabolism working harder for longer.

Now pair  this new nutrition with heavy weight lifting routines and minimal but high interval cardio sessions, and I got a  transformed body and a fat burning machine--okay, well that's what she said it was.
BUT
I truly felt that way, and by the end of the 12 weeks, I actually gained weight--of pure muscle of course-- and lost 3% of my body fat! Inches gone all around.


I was over the moon. Muscles are more toned than ever, fat is shrinking, and best of all I am NEVER hungry!

The whole plan is a  little more complicated than this, I mean, it's a life changer. But I encourage you to look into the Livefit trainer challenge and see if it's for you.
12 weeks truly isn't that long and it will honestly change your life.

The biggest thing I want you to take from this article is that food is not the enemy (thank God, says the food addict inside of me), and it can actually help you loose weight if you eat it in the right ways (all good ways in my opinion)  and maintain healthy workout regiments that doesn't only include slaving away on the the elliptical or treadmill.
GO LIFT SOME WEIGHTS!

If you have any questions or comments please do not hesitate to ask!


Many blessing on your journey!


Sunday, July 14, 2013

LiveFit The FINAL RESULTS(week 9-12 combined)

sorry this is sooo late..... but I'm

Done.

Yup. 12 weeks. Finished.


I am so proud of myself. It was not easy, but it was fun. Honestly, this was such a life changing experience. I worked my butt, arms, and stomach off and I feel fantastic.

I feel smaller all around the numbers show success.

The last three weeks were the hardest mostly because you had to pay the most attention to your diet and push hard every day to ensure results. I had to switch things up a bit because my schedule got very crazy. It turned out that I worked out 3-4x a week (Weds-Sunday) and I managed to get the 7 days worth of exercise in by doubling up on certain days.

I slacked a bit on the cardio, I really tried to do every one, but I seriously only had about an hour a day and the weight lifting itself takes a lot of time if you are going to do it right.

I did however, learn to love HIIT--High Intense Interval Training for the cardio.
Me right after a HIIT workout. 
Sweat and all!

Sprinting 30 sec at a 2.5 incline at an 8.0 speed then 30 sec rest, repeat for 30 min.
I felt like a beast, and doubled my calorie burn in less time. Whoot!

The diet for the final phase changed dramatically. We started carb cycling. I would usually go Sunday-Tuesday low car, High carb wednesday, and the last week high carb Saturday. The interesting part was that you kept the same calorie intake for each high or low day. So I found low carb higher calorie foods for low days: such as nuts, cottage cheese, string cheese etc; and then switched to low calorie high carb foods such as oatmeal, apples, bananas, soup etc. It was fun but repetitive.


The weight lifting also switched gears. Instead of focusing on pushing yourself to high weight you lowered you weights and pushed yourself to more more reps. That was hard. You really had to concentrate on form because even though you were using less weight your were doubling or tripling the amount of time you lifted it. Ouch.

Overall, I am ecstatic with my results. I feel wonderful, my body looks fitter, and best of all I feel stronger!


My Numeric Results:
          Before:                                                       After:
  • Weight                 139lbs                                                  140lb
  • Body fat:            24%                                                    21%
  • Chest:                   34 in                                                    35.5in
  • Arms                    11.3 in                                                 12.5in
  • Hips                    36.50 in                                               34in
  • Waist                  33.50 in                                               31in
  • Thighes                 22in                                                     22.4in
  • Calves:                 15 in                                                    14.5in
  • Forearms:       8 in                                                      9in
  • Shoulders:          40.5 in                                                 42.4in


          What's next?

More weightlifting and more HIIT!
I think I'll be on the look out for  another program ( I like striving for a goal, keeps me motivated), but until then I might just use the workouts from phase 2 and 3. They are just so great and versatile. I think I'll do carb cycling often but not every week.

I hope that my journey helps you find your way through yours and know that you are not alone. It's never ending but we can all do it together! On to the next thing!


Wanna See my whole journey through LiveFit? 
and scroll down! 

Monday, June 17, 2013

Cereal Chocolate Muffins


It all started with a cereal.


A hot cereal, named Coco Wheats.

Maybe you've heard of it, maybe you've even eaten it.  For me, it was a disaster turned good fortune.

You see, I bought Coco Wheats from Walmart in the uber mark down section. You know, that section where they put a pile of "stuff"" that was either returned and the box is ripped, or the plate has scrape, or maybe, in my case, they just have too much product; Coco Wheats was one of them.

Now I am not the fan of hot cereal. Now don't get me wrong, I do love me some oatmeal, but other than that, I'm an decadent omelet type girl for breakfast. So why did I go for this hot cearl that was on mark down for 2 dollars? We,ll it's becuase I read the label.

Simple, readable incrdients that included chocolate; A health-nut's dream.
Ingredients: What Farnia, Cocoa, calcium Phosphate, artificial flavors, vitamin C, Niacin, iron, Folic Acid, Vitamin B12, B6, B2, and B1. Done. 

No enriched flour here.

I was quite hopeful for this cearal and was excited to try it.Unfotrunaltly it didn't turn out so good.
I followed the directions for the most part;
It states 3 tbs of the cereal for 1 serving, plus one cup of milk or water. I choose to do half cup almond milk, half cup water,  and added a scoop of protein powder just for kicks, then microwave for 1 min, stir, and continue microwaving, and stirring until desired thickness (mine was about 4 min).

Maybe it was the protein powder that through this cereal off, but I highly doubt it, but it turned out aweful! Taste, texture, overall look. Gross.

I was quite sad as I dumped the bowl of mush in the trash and starred at the box for fear that it was now going to be that one thing in your pantry you know you should just throw out because no one in your house likes it and it's been there for ages type of thing.

Then a lightbulb hit. On the side of the box was a recipe for chocolate brownies using the coco wheats. And I got to thinking, that hey, I've read that wheat farnia* does well used as a whole wheat type flour subsitute....and I have 2 overripe bannas, and one needs-to-be-used today zucchini in the fridge....so I'll MAKE MUFFINS!!!! (Didn't think that was coming did you?)

And that's exactly what I did. And guess what?
They are wonderful, very filling, chocolate, healthy, muffins! Miracles do happen.

*(Wanna know what the heck Wheat Farnia is? Click HERE)

Ingredients: 
1 1/2 cup Coco Wheats (or regular What Farnia)
1 1/2 cup all purpose flour
1/3 cup cocoa powder
1/4 tsp salt
2 bannanas, very ripe
1 cup shredded zucchini
2 eggs
1 tsp vanilla extract
3 tbs coconut oil
3 tbs butter
1/2 cup honey
1 tsp baking powder
1 tsp baking soda

Chocolate Drizzle (optional)
3tbs chocolate chips
1tsp coconut oil

Directions:
Preheat the oven to 425 F. (YOU WILL BE LOWERING THE TEMP)*
Mix the coco wheats, flour, cocoa powder, salt, baking soda, and baking powder in a bowl.

Beat together the banans, zucchini, eggs, vanilla, coconut oil, butter, and honey in another bowl.

Add the wet ingredients into the dry and mix very well. The mixture will be thick.

Spray a muffin tin with non-stick spray and evenly scoop the mixture into the muffin cups. Fill the cups all the way to the top.

Place your filled pan in the oven for 5 min at the preheated temperature and then reduce the heat* to 325 F. and bake for another 10-12 min, or until a toothpick comes out clean.

Remove from pan and let cool for 10 min.

while, cooling, melt chocolate chips and coconut oil in the microwave in 30 sec intervals until fully melted.

Drizzle chocolate over the top of the muffins.


*(starting the cooking temp high and then lowering flash cooks the mixture
Enjoy!!!!


Monday, June 10, 2013

Balsamic Pineapple Chops

Pineapple is a terrific fruit.
 It has a distinct sweet and tangy  flavor that really stands out to my palate.

I admit however, that I usually only bake with fruit, not cook with it. Now, I have make some amazing sweet and sour chicken with pineapple, and that was a huge hit; but to me, thinking about pairing meat and fruit together--no pun intended--just doesn't cross my mind when I think of dinner.

And I know, there are some pretty amazing dishes out there that add fruit to the main course--peaches especially-- so I hope this recipe can be the start of a new way of cooking for me.

To fruit!

Ingredients:
4 center cut pork chops,
1 tsp garlic powder
1/4 cup balsamic vinegar
1/8 tsp salt
1/8 tsp pepper
1/2 onion, chopped
1 can pineapple, diced

Directions: 
Trim any fat off the pork chops as desired.
Whisk together balsamic vinegar, garlic powder salt pepper, and chopped onion. Place the marinade in Ziploc back along with pork chops. Seal and then shake/mix everything together so that pork chops are well covered.
Let sit in the fridge for 15-30 min (this can marinate overnight, if desired)
Heat a large skillet on medium high heat.
Take out the bag of marinated chops and dump the entire contents of the bag into the skillet.

Sear each side of of the pork chop for 2 minutes so that each side has  a nice browned edge.

Reduce heat to medium low and add the entire can of diced pineapple along with juices over the pork  chops. Cover and let simmer for 15-20 min. (During this time you can make some amazing side  dish!)

Remove the chops from heat and let rest for 3 min.

Plate chops and top with extra juice from the pan and some pineapple .


Enjoy!!!!

Sunday, May 26, 2013

Healthy Spring Stir Fry


Yes, stir fry can be clean eating and healthy,


and best of all, be DELICIOUS!

I put this simple dish together in the morning for my lunch at work and was so pleased with the outcome. I could easily be doubled or tripled to feed more than one, and feel free to mix up the veggies and meat as desired. 


Recipe adapted from Skinnytaste
Ingredients: 
4-6oz chicken breast, cooked and cubed
1/2 cup brown rice, cooked
3tbs egg whites
1 large carrot, chopped
1/2 cup sugar snap peas
1-2 garlic cloves, minced
red onion, slivers
1-2 tbs low sodium sauce
1/4 tsp garlic powder (optional: I like garlic)
1/4 tsp pepper
1 tbs olive oil

Directions: 

Mix 1tbs soy sauce,  pepper, and garlic powder in a bowl.
Toss cubed chicken in sauce and set aside.
Heat olive oil in a small skillet over medium heat. 
Add onion and cook until partially translucent.
Then add minced garlic, chopped carrots, and snap peas and sir fry until veggies are tender.
Move cooked veggies to one side of the pan and add in the egg whites. 
Stir them until they scramble and then mix in with the veggies.
Mix the veggie-egg mixture with  the cooked rice and sauced chicken. 
Add another 1/2-1tbs soy sauce and toss it all together until well combined.

ENJOY!!!!


Thursday, May 23, 2013

LiveFit Phase 2 Results


Wow, What a phase. 


I really didn't think there was much change besides me just upping my weights with more ease, but if you look at where I started things are looking good.


Everything is a little more 'pulled' in, which is always a plus. 

My measurements are what tell the truth and honestly, nothing drastic except in my waist which I am very thankful for:
 2.5 inches 
GONE.

Measurements: 

Chest increased :  35in to 35.3in
Arms increase:   12in to 12.2in
Hips decrease:  36.5in to 36in
Waist decrease: 33.5in to 31in
Thighs increase:  22in to 23in
Calves increase: 14.7in to 15in
Forearm increase:  8.5 in to 8.8in
Shoulders increase  42.5in to 43in

Anything fantastic in this phase? Not really.
 I just really focused on the diet because it switched up a bit. 

No more "carbs" for dinner, instead you have 3rd full serving of carbs  with your small meal; mid-afternoonish. 
This made me really think outside of the box when it came to making dinner. 

For most of my life dinner meant: pasta, breads, rice, potatoes, etc. but it had to quickly become, salad, veggies, kale chips, and more salad paired with LOTS OF PROTEIN! 

 I also had to think about last meal as well. I have yet to have 5 egg whites for my last meal--sorry Jamie. But I have had fun making protein filled "dessert" like meals. 

Such as Greek yogurt with some honey, fresh strawberries and a tbs or two of 70% dark chocolate chips. 

Or my all time favorite: Mock-Wendy's Frosty Protein shake. 
This will rock your world. 
3/4 cup unsweetened vanilla almond milk 
1 packet truvia (or stevia) or sweetener of choice
1 heaping tbs of cocoa powder
 (more if you want it more chocolatey)
1 scoop vanilla protein powder
8-10 ice cubes (this is key to making it a frosty) 
Blend a heavy duty blender 
(I did this in my cup blender and broke it. sad day)  
 Enjoy your seriously delicious healthy protein packed dessert shake.

  
Alright, so Phase 3 is next and things are going to be different. 
I recently got a Lead in a Musical (ANNIE GET YOUR GUN) so rehearsals will be taking up my evenings for the next 10 weeks which puts a damper on my workout times. So I've decided to drag phase 3 out and only work out 3 times a week attempting to doubling up work outs on those days. 
It is not going to be easy but I am determined to stick with it and finish this trainer.
I'll still maintain the diet laid out, which I LOVE, and will try my hardest to keep it for the remainder of my life. 

I love being a healthy and strong woman. 
Who's with me?

Here's to the long haul. 


Wanna read more about my journey through LiveFit Trainer? 
CLICK HERE and scroll down.
 

Monday, May 20, 2013

Whole Wheat Flax Pita Bread


I love pita bread.


I buy it every 2 weeks and fill it with all kinds of concoctions, my favorite being almond butter mixed with greek yogurt and honey, topped with half a banana. SO GOOD.

Any who, I went to go pick up my favorite heart-healthy flax and oat pita, but the store didn't have any!!! I was so upset. I looked and looked, and asked, and they looked, no luck.
So I figured, this just mean it's time to make my own.

I have several pita recipes booked marked, and most of them are the same, and pretty simple:  Flour, salt, yeast, and oil with maybe some sugar. 

I pulled up three of my favorite recipes (with pictures of course) and started to bake away.

Of course I used my bread machine to do the mixing, and of course I wanted to make my own recipe so I adjusted a few things, but they worked, poofed a little--I think its because I used a stone ground whole wheat--harder to break down--, and are ready to devoured.


Ingredients: 
3 cups whole wheat flour
1 tsp salt
2 tsp active yeast or rapid rise yeast
1 tsp honey
1 tbs coconut oil
2 tbs flax seed, ground
1 1/4 cup water, divided

Directions:
bread machine, dough cycle. add water if dough is not sticking together after 4 min or so.


preheat 450 F.  with pan in the oven.
pull out onto floured surface. separate into 8 balls.
roll out into thin disks.


Flip disks on pan and bake for 3 min until poofed

place and cover with a clean towel and while you cook the rest.


You may have to gently cut into the pockets if not all parts poofed up.

ENJOY!!!


 P.S. These will last about 3-5 days in THE FRIDGE and about 2 months in the freezer. DON'T LEAVE THEM OUT, they mold quickly...I learned that the hard way.


Friday, May 10, 2013

Homemade Green Giant Vegetable Medley


We love the Green Giant Vegetable Medleys Steamers.

They are a perfect side to many of our dishes. However, they are starting to add up in price for such a small amount: 2 servings per bag! REALLY!?


 So I decided to make my own, and freeze it.

SUCCESS. 
8 servings for half the price of one bag. 
Winning.


Ingredients:

Cream Sauce
1/2 cup milk
1/4 chicken stock cube, granulated
1/4 tsp parsley
1/2 tsp garlic powder
1 tsp onion flakes
1 1/4 tsp cornstarch

The Medley
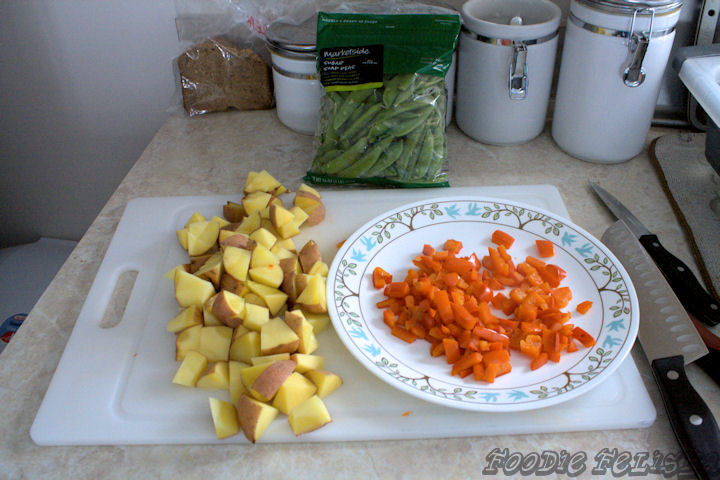
1lb of sugar snap peas
4 small red potatoes
1 large red bell pepper
2-3 tbs olive oil

salt and pepper to taste

Directions:
Sauce
On medium heat, heat milk and chicken stock granules in a small pot until it starts to produce steam. Whisk in seasonings and then cornstarch. Continuously whisk for 2-3 min.. Remove from heat and set aside. 

The Medley  
Wash and scrub potatoes under warm water. Chop into bite size chunks. Set aside. 
Wash bell pepper and chop. Set aside. 
Wash sugar snap peas if needed, set aside. 

Heat a medium skillet on medium high heat and add 1 tsp of olive oil.   
Add chopped bell pepper and saute until they start to brown a little. Remove from heat and set aside. 
Add another tsp of olive oil and saute sugar snap peas until they start to get brown spots. Set aside. 
Add another 1 tsp of olive  and saute potatoes until they start to get brown spots.

Dump all medley ingredients into a large bowl and pour cream sauce over it. Mix until well combined.
Let cool for 30 min, lightly covered. 

To Freeze:  
Place combined medley into a large freezer zip lock bag and lay flat in the freezer. 

To Cook from Freezer: 
Remove ~2 cups and microwave, covered (to steam) for 4-5 min until potatoes are cooked through.


ENJOY!!!!
 

-->

Wednesday, April 24, 2013

The Dinner Roll


 Why not make your own rolls?


It's seriously so easy, especially if you have a bread machine. 
Plus, it's not full of unpronounceable preservatives and nothing beats homemade bread, am I right? 

These rolls were awesome. Soft and yet hearty enough to hold it's own.  I am not a fan of those sweet or white rolls; they are just not dense enough and immediately turn into sugar when digested. 

So do a favor for your glycemic index and makes these.
Oh and they cost about a dollar to make about 32 rolls so save yourself some money too!


Ingredients:
2 cups all purpose flour
2 cups whole wheat flour
1 tbs wheat gluten
3 tsp bread machine yeast
3/4 cup  water
1/4 cup milk
4 tbs coconut oil,
3 tbs honey
1 1/4 tsp salt
1 egg, whisked


Directions:
Place everything in the bread machine according to the manufacture--Mine asks for liquids to be put in first so I put warmed water and milk (see note), whisked egg, and salt in first (placing the salt in the liquid insures the yeast will not activate too fast and die), then flours, and then made indents in the flour to hold the honey, coconut oil, and yeast.

Set the machine to dough cycle.

After about 5-6 min open the machine--it's okay if it is still running, and check the dough. If it looks dry,  clumping into a tight ball, add 1 tbs of milk at a time until it starts to stick to a side of the machine. If it looks too wet, sticking to all sides of the machine, add in 1 tbs of flour until it 
starts to pull away from the wall.

It is very important to check dough as it kneads. Perfect dough takes precision but each machine, and general temperature of the environments vary, so it's up to you to get it just right for your recipe. (mine needed 2 1/2 extra tbs of milk).
Non-stick baking pans of choice: I used a 9x13 and 7x11.

When dough is finished remove from pan and kneed into a ball.

Slice dough in half and then slice those halves in half and continue slicing halves until you get 32 pieces  (Feel free to slice larger rolls if desired).

Roll each piece into a ball and place in prepared pans. (see note)

Cover with a clean towel and let sit for an hour, until dough has doubled in size. 

Preheat oven 350 F.
Remove towel and place in oven to bake for 10-12 min. Until tops are a nice golden brown. 


Remove and brush the tops with butter, if desired. 
Let cool on a rack for 1-2 min before serving. 
ENJOY!!!!
 Notes:
* I microwaved my milk and water together for 1 min.   
* I rolled my balls and then placed them in the fridge to rise slower overnight  and baked them the next day, letting them sit outside the fridge for and hour or two before baking, until doubled in size.